

목표
게임을 만들다가 아래 보이는 UI에 아이콘이 필요하게 되었습니다.

그래서 프리팹을 통해서 아이콘을 만들고 버튼 아이콘에 넣는 목표를 세웠습니다.
그 전에 인터넷을 통해 좋은 자료를 발견해서 참고 했고 이 코드를 사용하여 필요한 스냅샷을 제작해 보겠습니다.
참고 : https://gist.github.com/mickdekkers/5c3c62539c057010d4497f9865060e20
Take snapshot images of Prefabs and GameObjects in Unity using Render Textures
Take snapshot images of Prefabs and GameObjects in Unity using Render Textures - SnapshotCamera.cs
gist.github.com
준비
일단은 스냅샷을 찍을 프리팹이 필요합니다.

이렇게 준비를 하고 빈 씬을 만들어 줍니다.

빈씬을 만든 뒤 빈 오브젝트를 하나 만들어 줍니다.
그다음에 저 코드를 복사해서 SnapshotCamera 스크립트 만들어 붙여 넣습니다.

사용
일단 먼저 스크립트를 하나 만들어 줍니다.
그다음에 이 코드를 넣습니다.
using System.Collections;
using System.Collections.Generic;
using UnityEngine;

public class UseSanpShot : MonoBehaviour
{
    // 받은 스냅샷 카메라 스크립트
    private SnapshotCamera snapshotCamera;
    // 찍을 오브젝트
    public GameObject gameObjectToSnapshot;

    // 파일 주소 설정
    readonly string Path = Application.dataPath + "/MobileGallery/SnapShots";
    // 파일 이름
    string Name;

    void Start()
    {
        // 파일 이름 설정
        Name = gameObjectToSnapshot.gameObject.name + "Icon";

        // 카메라 설정
        snapshotCamera = SnapshotCamera.MakeSnapshotCamera(0);
        // 사진 찍기
        Texture2D snapshot = snapshotCamera.TakePrefabSnapshot(gameObjectToSnapshot);
        // 사진 저장
        SnapshotCamera.SavePNG(snapshot,Name, Path);
    }
}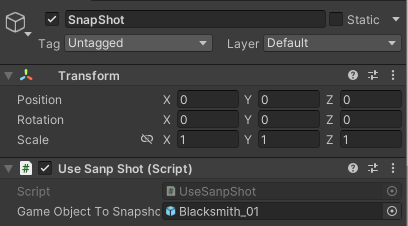
그다음에 빈 오브젝트에 스크립트를 넣고 Game Object To Snapshot에 프리팹을 넣어서 주면 됩니다.
위에 보시다시피 Start 시 실행이 되게 했기 때문에 시작 시 Png 파일이 바로 생성이 됩니다.


수정
위에 있는 그대로 쓰면 이미지가 잘 안 나올 수 도있습니다. 그래서 코드를 조금 수정해야 합니다.
받은 코드를 그대로 쓰면 이미지의 의치가 맞지 않아 사진이 안 나올 수도 있습니다.
    /// <summary>
    /// The default position offset applied to objects when none is specified.
    /// </summary>
    public Vector3 defaultPositionOffset = new Vector3(0, 0, 0);
    /// <summary>
    /// The default rotation applied to objects when none is specified.
    /// </summary>
    public Vector3 defaultRotation = new Vector3(0f, 0f, 0f);
    /// <summary>
    /// The default scale applied to objects when none is specified.
    /// </summary>
    public Vector3 defaultScale = new Vector3(1, 1, 1);
    /// <summary>
    /// The default camera position offset
    /// </summary>
    public static Vector3 drfalutCameraPositionOffset = new Vector3(-10f, 9.5f, -10f);
    /// <summary>
    /// The default camera rotation
    /// </summary>
    public static Vector3 drfalutCameraRotation = new Vector3(30f, 45f, 0);
그래서 저는 이렇게 포지션 및 회전을 수정했고 카메라 포지션 하고 회전을 또 추가하여 카메라에 적용 후 사용했습니다.
 public static SnapshotCamera MakeSnapshotCamera(int layer = 5, string name = "Snapshot Camera")
    {
        if (layer < 0 || layer > 31)
            throw new ArgumentOutOfRangeException("layer", "layer argument must specify a valid layer between 0 and 31");

        // Create a new GameObject to hold the camera
        GameObject snapshotCameraGO = new GameObject(name);
        // Add a Camera component to the GameObject
        Camera cam = snapshotCameraGO.AddComponent<Camera>();

        snapshotCameraGO.transform.position = drfalutCameraPositionOffset;
        snapshotCameraGO.transform.rotation = Quaternion.Euler(drfalutCameraRotation);


        // Configure the Camera
        cam.cullingMask = 1 << layer;
        cam.orthographic = true;
        cam.orthographicSize = 2;
        cam.clearFlags = CameraClearFlags.SolidColor;
        cam.backgroundColor = Color.clear;
        cam.nearClipPlane = 0.1f;
        cam.enabled = false;

        // Add a SnapshotCamera component to the GameObject
        SnapshotCamera snapshotCamera = snapshotCameraGO.AddComponent<SnapshotCamera>();

        // Set the SnapshotCamera's cam and layer fields
        snapshotCamera.cam = cam;
        snapshotCamera.layer = layer;

        // Return the SnapshotCamera
        return snapshotCamera;
    }
여기 부분에서 카메라 위치를 수정하기 위해 밑에 두 줄을 추가했습니다.
snapshotCameraGO.transform.position = drfalutCameraPositionOffset;
snapshotCameraGO.transform.rotation = Quaternion.Euler(drfalutCameraRotation);
그 결과

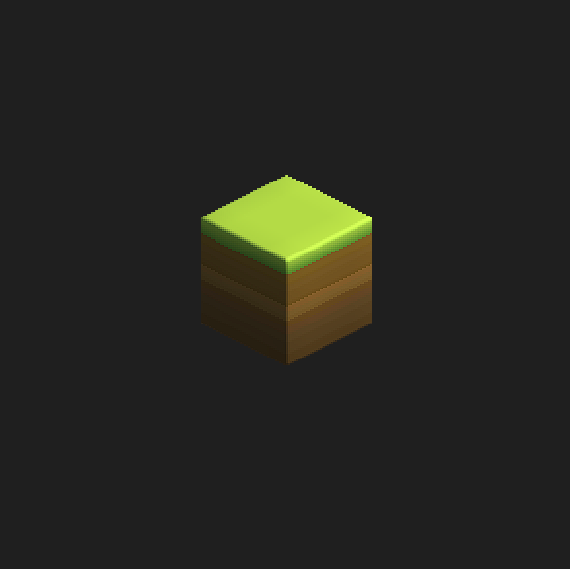
이렇게 이미지를 뽑았습니다.
참고
오브젝트 용
public Texture2D TakeObjectSnapshot(GameObject gameObject, int width = 128, int height = 128)
    {
        return TakeObjectSnapshot(gameObject, Color.clear, defaultPositionOffset, Quaternion.Euler(defaultRotation), defaultScale, width, height);
    }
프리팹 용
public Texture2D TakePrefabSnapshot(GameObject prefab, int width = 128, int height = 128)
    {
        return TakePrefabSnapshot(prefab, Color.clear, defaultPositionOffset, Quaternion.Euler(defaultRotation), defaultScale, width, height);
    }
오브젝트 랑 프리팹 용 Snapshot 이 따로 있습니다. 따라서 구분을 하고 넣어 줘야 합니다.
public Texture2D TakePrefabSnapshot(GameObject prefab, Color backgroundColor, Vector3 positionOffset, Quaternion rotation, Vector3 scale, int width = 128, int height = 128)
    {
        if (prefab == null)
            throw new ArgumentNullException("prefab");
        else if (prefab.scene.name != null)
            throw new ArgumentException("prefab parameter must be a prefab! If you want to use an instance, use TakeObjectSnapshot instead.", "prefab");

        // Prepare an instance of the prefab
        GameObject instance = PreparePrefab(prefab, positionOffset, rotation, scale);

        // Take a snapshot
        Texture2D snapshot = TakeSnapshot(backgroundColor, width, height);

        // Destroy the instance we created
        DestroyImmediate(instance);

        // Return the snapshot
        return snapshot;
    }
배경 색, 포지션, 회전, 스케일을 입력할 수 있습니다. 입력 안 할 시 배경색은 없고 포지션 회전 스케일은 디폴트 값이 들어가게 됩니다.
 /// <summary>
    /// The default position offset applied to objects when none is specified.
    /// </summary>
    public Vector3 defaultPositionOffset = new Vector3(0, 0, 0);
    /// <summary>
    /// The default rotation applied to objects when none is specified.
    /// </summary>
    public Vector3 defaultRotation = new Vector3(0f, 0f, 0f);
    /// <summary>
    /// The default scale applied to objects when none is specified.
    /// </summary>
    public Vector3 defaultScale = new Vector3(1, 1, 1);
디폴트 값은 위에 부분 값을 통해 수정할 수 있습니다.
버그
제가 카메라 위치 를 넣으면서 이미지에 프리팹에 안 나 오는 버그가 발생했습니다.
확인을 해보니 기존 코드에서
private GameObject PreparePrefab(GameObject prefab, Vector3 positionOffset, Quaternion rotation, Vector3 scale)
    {
        GameObject gameObject = GameObject.Instantiate(prefab, transform.position + positionOffset, rotation) as GameObject;


        gameObject.transform.localScale = scale;
        SetLayersRecursively(gameObject);

        return gameObject;
    }
카메라 위치 정보를 받고 생성을 하는 것을 확인했습니다.
그래서 코드를 수정했습니다.
private GameObject PreparePrefab(GameObject prefab, Vector3 positionOffset, Quaternion rotation, Vector3 scale)
    {
        GameObject gameObject = GameObject.Instantiate(prefab, positionOffset, rotation) as GameObject;


        gameObject.transform.localScale = scale;
        SetLayersRecursively(gameObject);

        return gameObject;
    }
카메라 포지션 더하던 것을 제거 했습니다.
응용
아이콘을 만들다 보니 하나씩 하는 게 귀찮아졌습니다. 그래서 조금 코드를 수정하기로 했습니다.
using System.Collections;
using System.Collections.Generic;
using System.Threading.Tasks;
using UnityEngine;

public class UseSanpShot : MonoBehaviour
{
    // 받은 스냅샷 카메라 스크립트
    private SnapshotCamera snapshotCamera;
    // 찍을 오브젝트를 배열로 입력 받음
    public GameObject[] gameObjectToSnapshot;

    // 파일 주소 설정
    readonly string Path = Application.dataPath + "/MobileGallery/SnapShots";
    // 파일 이름
    string Name;

    void Start()
    {
        // 카메라 설정
        snapshotCamera = SnapshotCamera.MakeSnapshotCamera(0);
        for (int i = 0; i < gameObjectToSnapshot.Length; i++)
        {
            // 파일 이름 설정
            Name = gameObjectToSnapshot[i].gameObject.name + "_Icon";
            // 사진 찍기
            Texture2D snapshot = snapshotCamera.TakePrefabSnapshot(gameObjectToSnapshot[i]);
            // 사진 저장
            SnapshotCamera.SavePNG(snapshot, Name, Path);
        }
    }
}
코드에서 프리팹을 배열로 입력받게 설정하고 반복문을 통해 이미지를 생성했습니다.

결과 한꺼번에 잘 나온 것을 확인했습니다.